Alright folks, grab a cuppa because I just spent the last couple weeks wrestling with paints and brushes, trying to figure out this whole "realistic painting" thing everyone keeps banging on about. Looked tough as nails to me at first, honestly. But hey, thought I'd give it a proper crack and share the messy journey.
Jumping in Headfirst (and Making a Splash)
Right, where to even start? Didn't have a clue. My place looked like a proper chaos zone for a few days. First up, raided the shed and the local cheap art store. Dug out some acrylics I bought years ago thinking "I'll do a Bob Ross someday". Ha! Found a couple of battered brushes hiding under old newspapers – mostly flat ones, nothing fancy. Had zero expectations, which is probably good because...
I grabbed a photo of my dog, Monty – thought he'd be an easy subject. Famous last words. Slapped some gesso on this cheap little canvas board I had lying around. It felt weird, like spreading sour cream too thin. Then went straight for the paints, trying to match his fur color. Mixed what I thought was brown. Ended up looking like mud. Put a big blob of this "brown mud" roughly where Monty's head should be on the canvas. Yeah. It looked more like a misshapen potato than a dog. Total disaster zone. My wife walked in, looked at it, looked at the photo, snorted, and walked out.
The "Why is Nothing Working?!" Phase
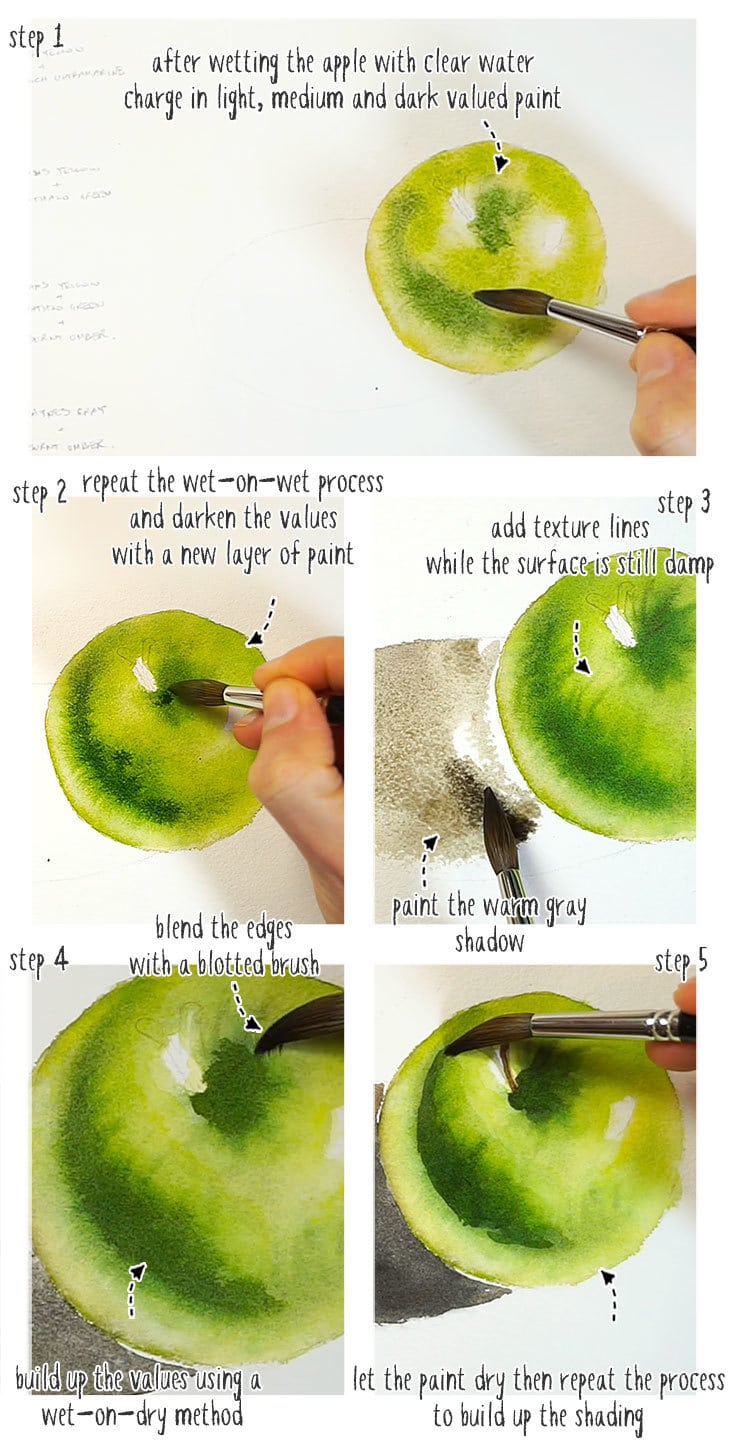
Got properly stubborn at this point. Stopped trying to paint Monty and just started doodling shapes on scrap paper. Circles, squares, an apple I had on the counter. Used a pencil first, just light lines, trying to see how it looked. This was different.
Then started looking closer at stuff around the house. Like, really closer. That apple? It wasn't just red! Saw bits of yellow, weird flashes of green in the shadow, little shiny highlights. Blew my mind. I tried copying it again. Instead of grabbing "red" paint, I actually squirted out a tiny bit of red, some yellow, a smidge of white. And for the dark side? Added a tiny, tiny bit of blue to my messy mix.
Painted the apple shape again. Took forever! Layered on a sort of medium red-yellow mix first, let it get a bit sticky. Then got a smaller brush, dipped it in a darker red (with that blue added), and carefully dabbed it onto the shadow part, trying to blend it into the first color while it was still wet. Messy! Picked out the very darkest shadow underneath with an even smaller brush and a really dark mix – almost purple-ish.
Saw the bright spot reflecting the window? Used a clean brush with pure white. Just a tiny dot! Didn't try to smear it all over. This actually started to look sorta 3D? Like the apple wasn't stuck flat on the paper. Big shift!
Glimmers of Hope (and Less Mud)
Went back to poor old Monty's photo, heart pounding a bit. This time, completely different approach. Drew LIGHT lines first, super basic shapes: big circle for head, smaller circle for snout, triangles for ears. Stopped trying to paint his WHOLE FUR at once. Mixed a lighter base color for the main fur areas and slapped that down roughly. While that was drying, mixed a much darker brown and focused ONLY on his big, dark eyes and the shadow under his chin. Carefully! Used a small brush.
When the base fur dried, mixed a slightly darker shade than the base. Dipped an old brush with stiff bristles into it, wiped off most on a rag, then gently dabbed it lightly over his back and sides to suggest fur texture. Didn't overdo it! Saved the lightest, golden bits of fur for last – a tiny brush, careful strokes. Didn't try to paint every single hair. Just gave hints. Slow going.
Stepped back. It wasn't perfect. Not by a long shot. Proportions were slightly off and the nose looked a bit plastic. BUT... it looked like Monty! You could tell it was him. That felt like winning the lottery after the mud-potato phase.
What I Actually Learned (The Messy Truth)
- Look. Like. Crazy. Seriously, spend ages just staring at what you want to paint. What are the absolute darkest bits? The absolute brightest? What colors are actually there?
- Start Simple, Seriously Simple. Forget the dog. Do an apple. Or a mug. Your brain will thank you.
- Light Sketch First is a Lifesaver. Gets everything in the right place roughly. Big stress reliever.
- Layer Like a Cake. Don't try to do everything in one go. Build the darks, build the lights. Let stuff dry between layers sometimes. Patience!
- Blending is Hard! Don't over-muddle. Sometimes rough brush strokes look better than a smudgy mess. Dab wet paint into semi-wet paint gently.
- Size Matters (Brushes!). Big mess areas? Big brush. Tiny details? Tiny brush. Get a couple decent, cheap ones.
- Expect Mess-Ups. I wrecked a few canvases. Learn from them, toss 'em if needed, laugh it off. Scrap paper is your friend.
So yeah. Realistic painting ain't magic, but it also ain't quick at first. It's more like learning to see stuff properly and then learning how to build it slowly with paint. My Monty painting sits proudly on the shelf now, faults and all. Still makes me smile remembering the potato phase. Go grab some cheap paint and a brush, find something easy around the house, and just start looking! See what happens.


